---
metadata:
- name: generator
content: Diplodoc Platform v5.57.3
alternate:
- https://boost.yandex.com/doc/en/ad-monetization/dev/unity7/adaptive-inline-banner.md
- https://boost.yandex.com/doc/ru/ad-monetization/dev/unity7/adaptive-inline-banner.md
- href: en/ad-monetization/dev/unity7/adaptive-inline-banner.md
type: text/markdown
title: Markdown version
- href: llms.txt
type: text/markdown
title: llms.txt
---
> **Documentation Index:** Fetch the complete configuration index at https://boost.yandex.com/doc/en/llms.txt
[//]: # (Эта страница переводится также на бразильский португальский — pt-BR)
# Adaptive inline banner
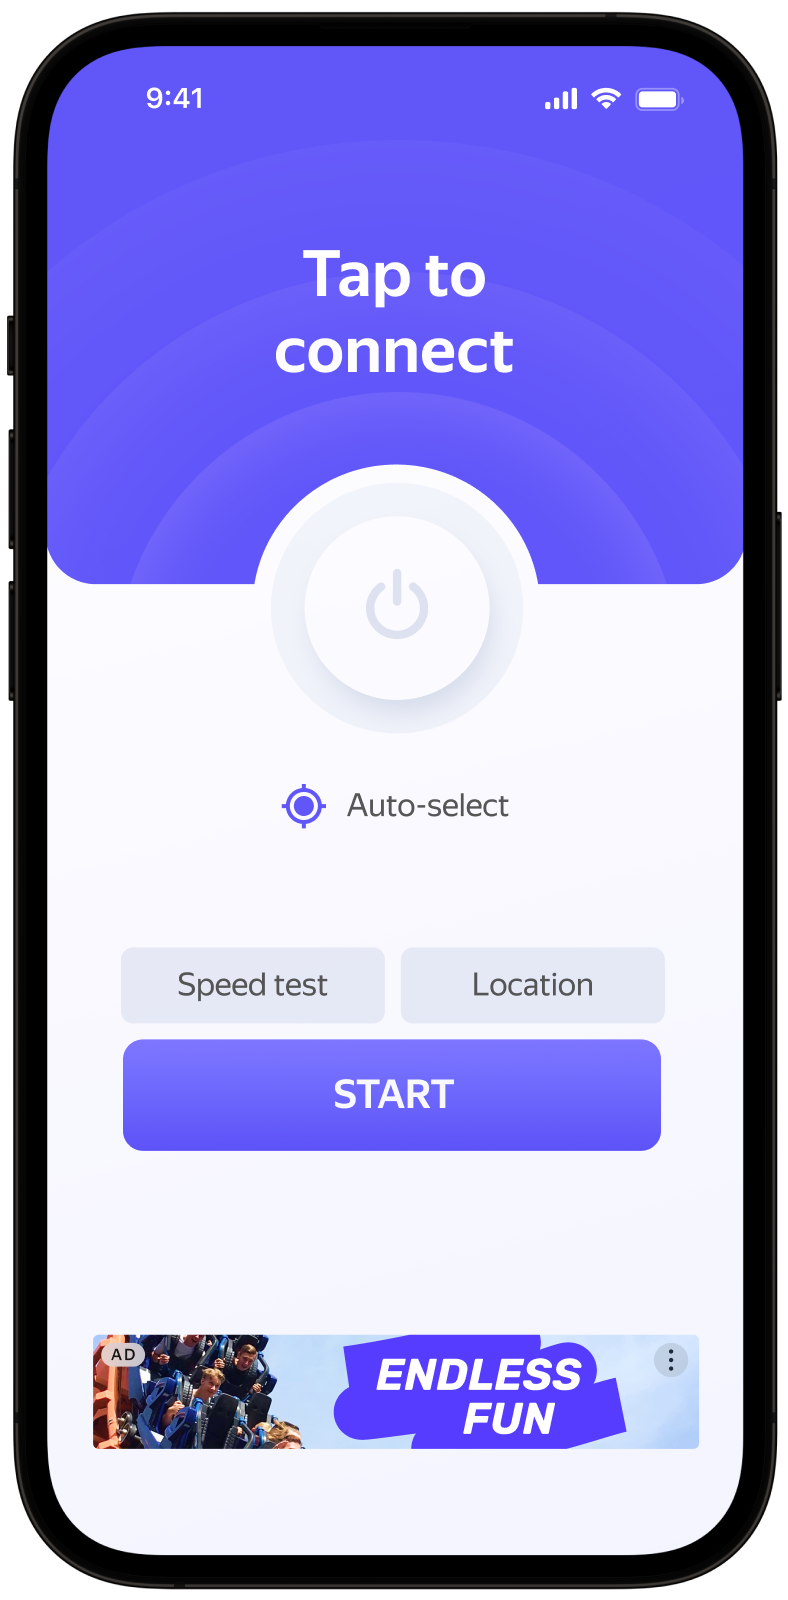
An adaptive inline banner is a flexible banner ad format that ensures maximum efficiency by optimizing ad size for each device.
This ad type lets developers set a maximum allowable width and height for the ad, though the optimal ad size is still determined automatically. To choose the best ad size, adaptive inline banners use a maximum height instead of a fixed one. That provides room for improving performance.
Typically, this format is used in feed-based apps or contexts where it's acceptable to primarily focus user attention on ads.
{% cut "Appearance" %}
 {% endcut %}
This guide shows how to integrate adaptive inline banners into Unity apps. Besides code samples and instructions, it also contains format-specific recommendations and links to additional resources.
## Prerequisite {#pre}
1. Follow the Yandex Mobile Ads plugin integration steps described under [Quick start](https://boost.yandex.com/doc/en/ad-monetization/dev/unity7/quick-start.md).
2. Make sure that you have the [latest version of the Yandex Mobile Ads Unity Plugin](https://boost.yandex.com/doc/en/ad-monetization/dev/platforms.md). If you're using mediation, update to the most recent [single build version](https://boost.yandex.com/doc/en/ad-monetization/dev/platforms.md).
## Implementation {#implement}
Key steps to integrate an adaptive inline banner:
* Create and configure the Banner ad object.
* Register a callback listener.
* Load the ad.
* Pass [additional settings](https://boost.yandex.com/doc/en/ad-monetization/dev/unity7/target-adfox.md) if you're using Adfox.
## Specifics of adaptive inline banner integration {#features}
1. If the `onAdFailedToLoad` event returns an error, don't try to load a new ad again. If there's no other option, limit the number of ad load retries. This will help avoid constant unsuccessful requests and connection issues if there are limitations.
2. For adaptive inline banners to work properly, [make your app layouts adaptive](https://developer.android.com/guide/topics/large-screens/support-different-screen-sizes). Otherwise, your ads might render incorrectly.
3. Adaptive inline banners work best when utilizing the full available width. In most cases, this will be the full width of the device screen. Be sure to consider the padding parameters set in your app and the display's safe area.
4. Adaptive inline banners are designed to be placed in scrollable content. Their height can be the same as the device screen or limited by the maximum height, depending on the API.
5. To get the size of the ad, use the `BannerAdSize.InlineSize(screenWidth, maxAdHeight)` method, which accepts the available width of the ad container and the maximum acceptable ad height as arguments.
6. The `BannerAdSize` object, which is calculated using the `BannerAdSize.InlineSize(screenWidth, maxAdHeight)` method, contains technical data for selecting the most effective ad sizes on the backend. The height of an ad may change each time it is loaded. You can get the actual width and height of the ad after receiving a message confirming that the ad has been loaded successfully.
## Adding Banner to the project
To display a banner in your app, create a `Banner` object in the script (in C#) that is attached to the `GameObject`.
```c#
using UnityEngine;
using YandexMobileAds;
using YandexMobileAds.Base;
public class YandexMobileAdsInlineBannerDemoScript : MonoBehaviour
{
private Banner banner;
private int GetScreenWidthDp()
{
int screenWidth = (int)Screen.safeArea.width;
return ScreenUtils.ConvertPixelsToDp(screenWidth);
}
private void RequestInlineBanner()
{
string adUnitId = "demo-banner-yandex"; // replace with "R-M-XXXXXX-Y"
BannerAdSize bannerMaxSize = BannerAdSize.InlineSize(GetScreenWidthDp(), 100);
banner = new Banner(adUnitId, bannerMaxSize, AdPosition.BottomCenter);
}
}
```
The `Banner` constructor contains the following parameters:
* `adUnitId`: A unique identifier that is issued in the Boost interface and looks like this: R-M-XXXXXX-Y.
{% note tip %}
For testing purposes, you can use the demo unit ID: "demo-banner-yandex". Before publishing your ad, make sure you replace the demo unit ID with a real ad unit ID.
{% endnote %}
* `BannerAdSize`: Size of the banner you want to display.
* `AdPosition`: The position on the screen.
* `InlineSize(int width, int maxHeight)`: Banner dimensions.
Set the width and maximum allowable height. The ad will fit into these dimensions. The height of the selected ad won't exceed the height of the device screen.
## Loading and rendering ads
After creating and configuring an object of the `Banner` class, you need to load the ad. To load an ad, use the `LoadAd` method, which takes the `AdRequest` object as an argument.
Before loading an adaptive inline banner, calculate the ad size for each device.
The operation is performed automatically via the SDK API: `BannerAdSize.InlineSize(screenWidth, maxAdHeight)`.
You can extend ad request parameters with the `AdRequest.Builder()` class to include information about the user's interests, page context, location, and other additional data in the ad request. Adding extra context to ad requests can greatly improve ad relevance. To learn more, see [Ad targeting](https://boost.yandex.com/doc/en/ad-monetization/dev/unity7/target.md).
To enable notifications when ads load or fail to load and track an adaptive inline banner's lifecycle events, set callback functions for the `BannerAd` class instance.
```c#
private void RequestInlineBanner()
{
// ...
AdRequest request = new AdRequest.Builder().Build();
banner.LoadAd(request);
}
```
## Banner ad events
To track events that occur in banner ads, register a delegate for the appropriate `EventHandler`, as shown below:
```c#
using System;
// ...
private void RequestInlineBanner()
{
// ...
// Called when a rewarded ad is loaded
banner.OnAdLoaded += HandleAdLoaded;
// Called when there was an error loading the ad
banner.OnAdFailedToLoad += HandleAdFailedToLoad;
// Called when the app goes inactive because the user tapped an ad and is about to switch to a different app (for example, a browser).
banner.OnLeftApplication += HandleLeftApplication;
// Called when the user returns to the app after a tap
banner.OnReturnedToApplication += HandleReturnedToApplication;
// Called when the user taps the ad
banner.OnAdClicked += HandleAdClicked;
// Called when an impression is registered
banner.OnImpression += HandleImpression;
// ...
}
private void HandleAdLoaded(object sender, EventArgs args)
{
Debug.Log("AdLoaded event received");
banner.Show();
}
private void HandleAdFailedToLoad(object sender, AdFailureEventArgs args)
{
Debug.Log($"AdFailedToLoad event received with message: {args.Message}");
// We strongly advise against loading a new ad using this method
}
private void HandleLeftApplication(object sender, EventArgs args)
{
Debug.Log("LeftApplication event received");
}
private void HandleReturnedToApplication(object sender, EventArgs args)
{
Debug.Log("ReturnedToApplication event received");
}
private void HandleAdClicked(object sender, EventArgs args)
{
Debug.Log("AdClicked event received");
}
private void HandleImpression(object sender, ImpressionData impressionData)
{
var data = impressionData == null ? "null" : impressionData.rawData;
Debug.Log($"HandleImpression event received with data: {data}");
}
```
## Testing adaptive inline banner integration {#test}
{% list tabs %}
- Android
### Using demo ad units for ad testing {#demo-blocks}
We recommend using test ads to test your adaptive inline banner integration and your app itself.
To make sure that test ads are returned for each ad request, we created a special demo ad placement ID designed to help you test your ad integration.
Demo adUnitId: `demo-banner-yandex`.
{% note warning %}
Before publishing your app in the store, make sure to replace the demo placement ID with the real ID you obtained in the interface Boost.
{% endnote %}
For the list of all available demo ad placement IDs, see [Demo ad units for testing](https://boost.yandex.com/doc/en/ad-monetization/dev/android7/demo-blocks.md).
### Testing ad integration {#test-int}
You can test your adaptive inline banner integration using the SDK's built-in analyzer.
This tool checks whether ads are enabled properly and outputs a detailed report to a log.
To view the report, search the keyword “YandexAds” in [Logcat](https://developer.android.com/studio/command-line/logcat), a tool for debugging Android apps.
```bash
adb logcat -v brief '*:S YandexAds'
```
If the integration is successful, the following message is returned:
```bash
adb logcat -v brief '*:S YandexAds'
mobileads$ adb logcat -v brief '*:S YandexAds'
I/YandexAds(13719): [Integration] Ad type banner was integrated successfully
```
If you're having problems integrating banner ads, you'll get a detailed report on the issues and recommendations for how to fix them.
- iOS
### Using demo ad units for ad testing
We recommend using test ads to test your ad integration and your app itself.
To make sure that test ads are returned for each ad request, we created a special demo ad placement ID designed to help you test your ad integration.
Demo adUnitId: `demo-banner-yandex`.
{% note warning %}
Before publishing your app in the store, make sure to replace the demo placement ID with the real ID you obtained in the interface Boost.
{% endnote %}
For the list of all available demo ad placement IDs, see [Demo ad units for testing](https://boost.yandex.com/doc/en/ad-monetization/dev/ios7/demo-blocks.md).
### Testing ad integration
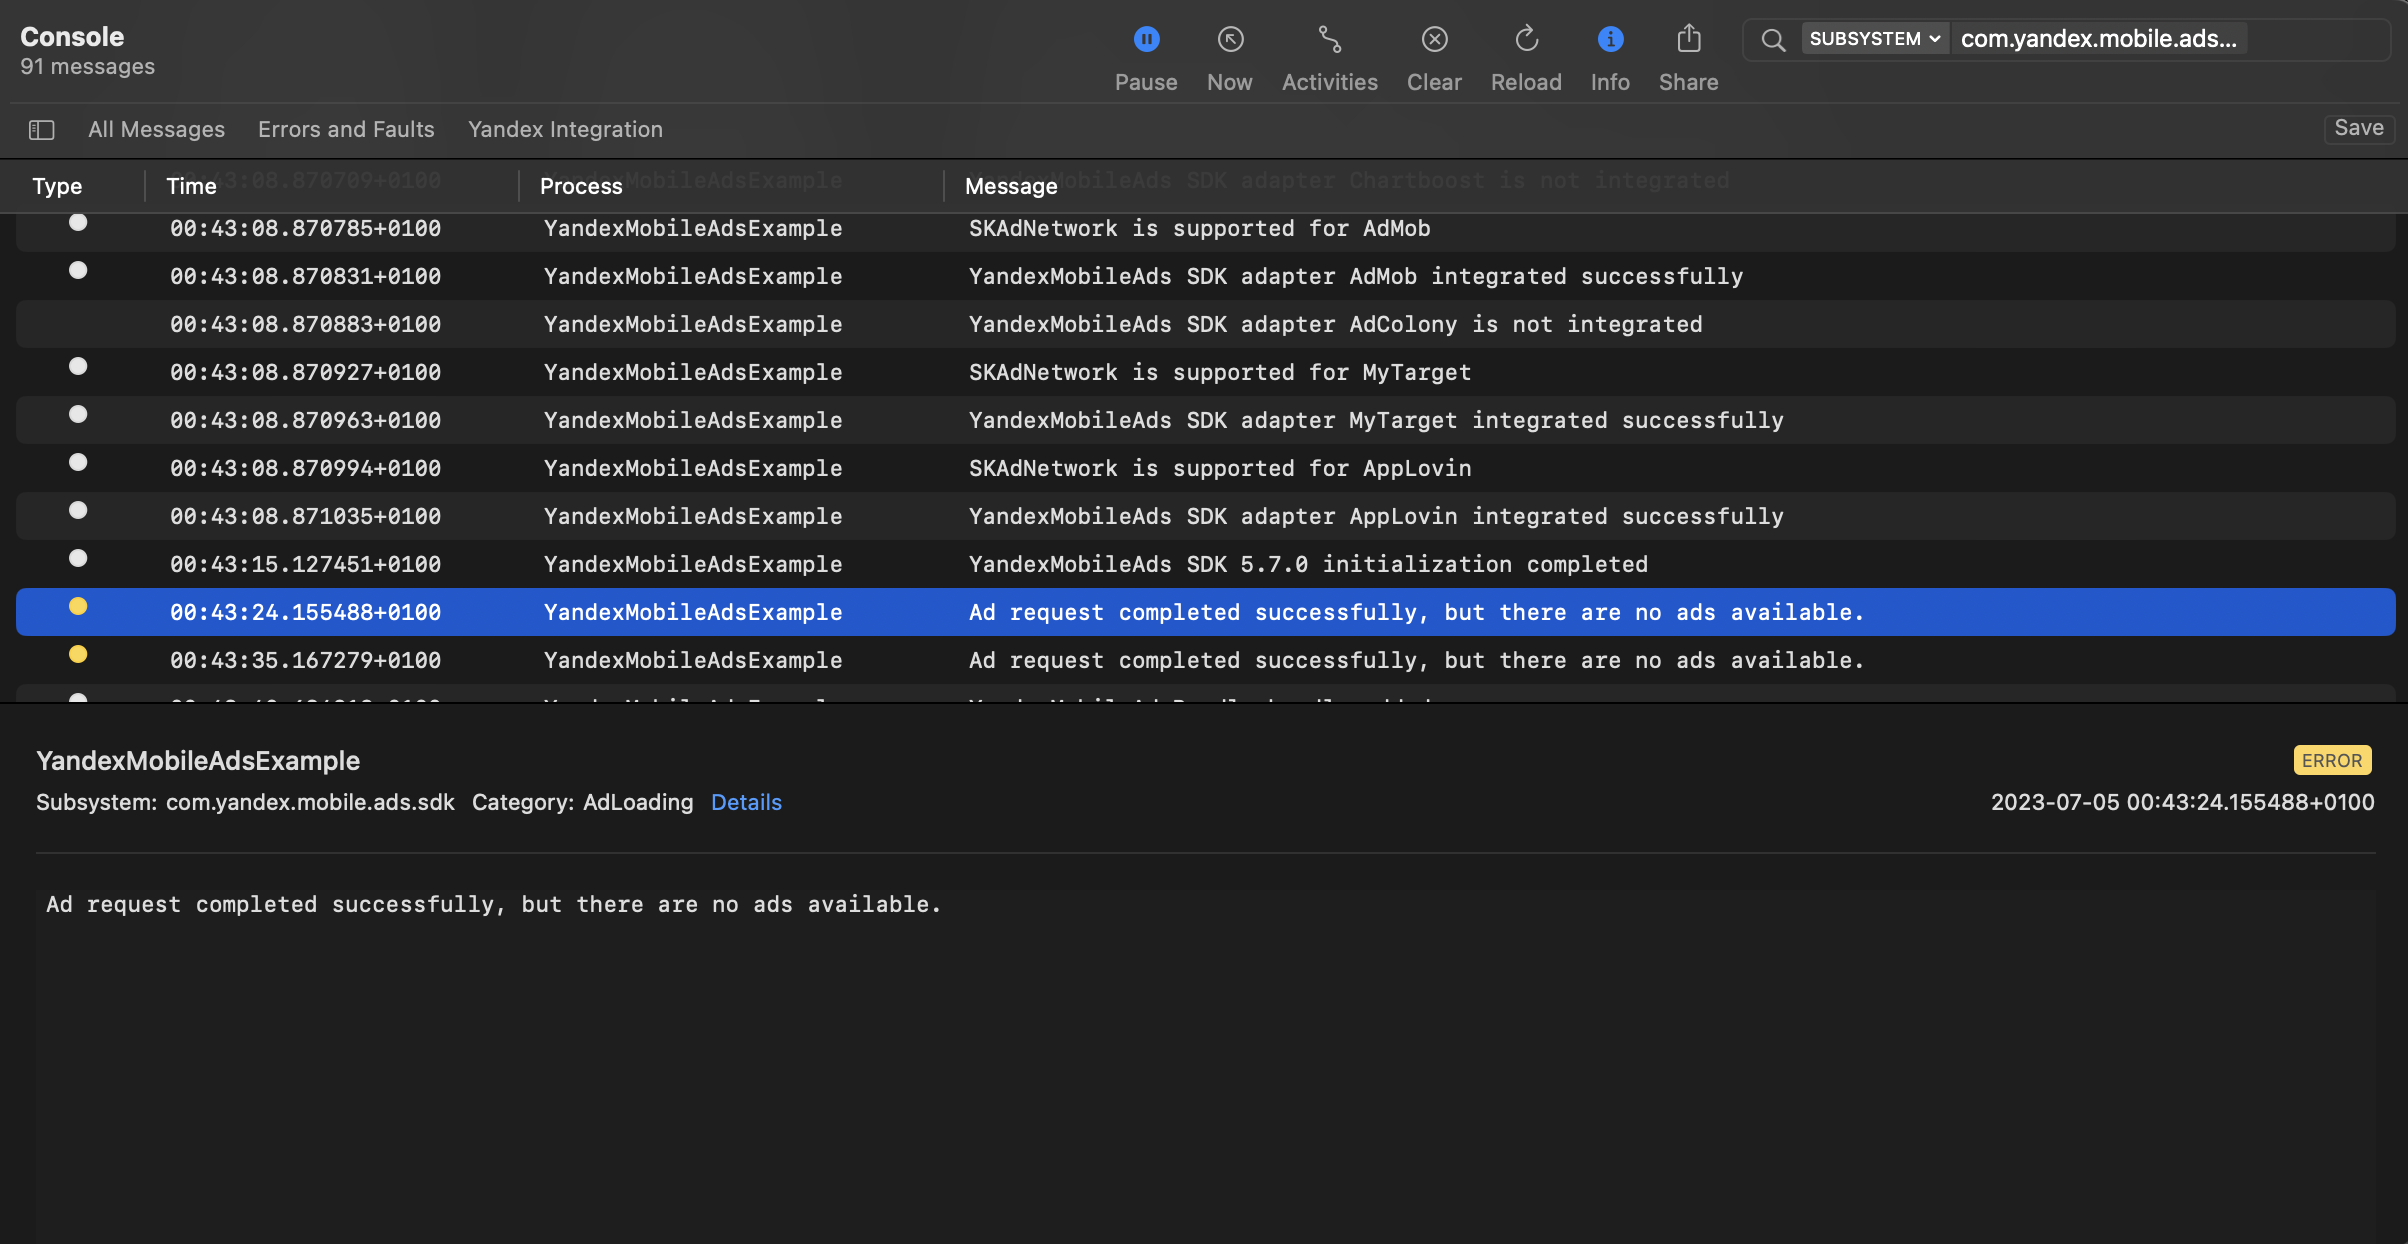
You can test your ad integration using the native Console tool.
To view detailed logs, call the `MobileAds` class's `enableLogging` method.
```swift
MobileAds.enableLogging()
```
To view SDK logs, go to the Console tool and set `Subsystem = com.mobile.ads.ads.sdk`. You can also filter logs by category and error level.
If you're having problems integrating ads, you'll get a detailed report on the issues and recommendations for how to fix them.
{% endcut %}
This guide shows how to integrate adaptive inline banners into Unity apps. Besides code samples and instructions, it also contains format-specific recommendations and links to additional resources.
## Prerequisite {#pre}
1. Follow the Yandex Mobile Ads plugin integration steps described under [Quick start](https://boost.yandex.com/doc/en/ad-monetization/dev/unity7/quick-start.md).
2. Make sure that you have the [latest version of the Yandex Mobile Ads Unity Plugin](https://boost.yandex.com/doc/en/ad-monetization/dev/platforms.md). If you're using mediation, update to the most recent [single build version](https://boost.yandex.com/doc/en/ad-monetization/dev/platforms.md).
## Implementation {#implement}
Key steps to integrate an adaptive inline banner:
* Create and configure the Banner ad object.
* Register a callback listener.
* Load the ad.
* Pass [additional settings](https://boost.yandex.com/doc/en/ad-monetization/dev/unity7/target-adfox.md) if you're using Adfox.
## Specifics of adaptive inline banner integration {#features}
1. If the `onAdFailedToLoad` event returns an error, don't try to load a new ad again. If there's no other option, limit the number of ad load retries. This will help avoid constant unsuccessful requests and connection issues if there are limitations.
2. For adaptive inline banners to work properly, [make your app layouts adaptive](https://developer.android.com/guide/topics/large-screens/support-different-screen-sizes). Otherwise, your ads might render incorrectly.
3. Adaptive inline banners work best when utilizing the full available width. In most cases, this will be the full width of the device screen. Be sure to consider the padding parameters set in your app and the display's safe area.
4. Adaptive inline banners are designed to be placed in scrollable content. Their height can be the same as the device screen or limited by the maximum height, depending on the API.
5. To get the size of the ad, use the `BannerAdSize.InlineSize(screenWidth, maxAdHeight)` method, which accepts the available width of the ad container and the maximum acceptable ad height as arguments.
6. The `BannerAdSize` object, which is calculated using the `BannerAdSize.InlineSize(screenWidth, maxAdHeight)` method, contains technical data for selecting the most effective ad sizes on the backend. The height of an ad may change each time it is loaded. You can get the actual width and height of the ad after receiving a message confirming that the ad has been loaded successfully.
## Adding Banner to the project
To display a banner in your app, create a `Banner` object in the script (in C#) that is attached to the `GameObject`.
```c#
using UnityEngine;
using YandexMobileAds;
using YandexMobileAds.Base;
public class YandexMobileAdsInlineBannerDemoScript : MonoBehaviour
{
private Banner banner;
private int GetScreenWidthDp()
{
int screenWidth = (int)Screen.safeArea.width;
return ScreenUtils.ConvertPixelsToDp(screenWidth);
}
private void RequestInlineBanner()
{
string adUnitId = "demo-banner-yandex"; // replace with "R-M-XXXXXX-Y"
BannerAdSize bannerMaxSize = BannerAdSize.InlineSize(GetScreenWidthDp(), 100);
banner = new Banner(adUnitId, bannerMaxSize, AdPosition.BottomCenter);
}
}
```
The `Banner` constructor contains the following parameters:
* `adUnitId`: A unique identifier that is issued in the Boost interface and looks like this: R-M-XXXXXX-Y.
{% note tip %}
For testing purposes, you can use the demo unit ID: "demo-banner-yandex". Before publishing your ad, make sure you replace the demo unit ID with a real ad unit ID.
{% endnote %}
* `BannerAdSize`: Size of the banner you want to display.
* `AdPosition`: The position on the screen.
* `InlineSize(int width, int maxHeight)`: Banner dimensions.
Set the width and maximum allowable height. The ad will fit into these dimensions. The height of the selected ad won't exceed the height of the device screen.
## Loading and rendering ads
After creating and configuring an object of the `Banner` class, you need to load the ad. To load an ad, use the `LoadAd` method, which takes the `AdRequest` object as an argument.
Before loading an adaptive inline banner, calculate the ad size for each device.
The operation is performed automatically via the SDK API: `BannerAdSize.InlineSize(screenWidth, maxAdHeight)`.
You can extend ad request parameters with the `AdRequest.Builder()` class to include information about the user's interests, page context, location, and other additional data in the ad request. Adding extra context to ad requests can greatly improve ad relevance. To learn more, see [Ad targeting](https://boost.yandex.com/doc/en/ad-monetization/dev/unity7/target.md).
To enable notifications when ads load or fail to load and track an adaptive inline banner's lifecycle events, set callback functions for the `BannerAd` class instance.
```c#
private void RequestInlineBanner()
{
// ...
AdRequest request = new AdRequest.Builder().Build();
banner.LoadAd(request);
}
```
## Banner ad events
To track events that occur in banner ads, register a delegate for the appropriate `EventHandler`, as shown below:
```c#
using System;
// ...
private void RequestInlineBanner()
{
// ...
// Called when a rewarded ad is loaded
banner.OnAdLoaded += HandleAdLoaded;
// Called when there was an error loading the ad
banner.OnAdFailedToLoad += HandleAdFailedToLoad;
// Called when the app goes inactive because the user tapped an ad and is about to switch to a different app (for example, a browser).
banner.OnLeftApplication += HandleLeftApplication;
// Called when the user returns to the app after a tap
banner.OnReturnedToApplication += HandleReturnedToApplication;
// Called when the user taps the ad
banner.OnAdClicked += HandleAdClicked;
// Called when an impression is registered
banner.OnImpression += HandleImpression;
// ...
}
private void HandleAdLoaded(object sender, EventArgs args)
{
Debug.Log("AdLoaded event received");
banner.Show();
}
private void HandleAdFailedToLoad(object sender, AdFailureEventArgs args)
{
Debug.Log($"AdFailedToLoad event received with message: {args.Message}");
// We strongly advise against loading a new ad using this method
}
private void HandleLeftApplication(object sender, EventArgs args)
{
Debug.Log("LeftApplication event received");
}
private void HandleReturnedToApplication(object sender, EventArgs args)
{
Debug.Log("ReturnedToApplication event received");
}
private void HandleAdClicked(object sender, EventArgs args)
{
Debug.Log("AdClicked event received");
}
private void HandleImpression(object sender, ImpressionData impressionData)
{
var data = impressionData == null ? "null" : impressionData.rawData;
Debug.Log($"HandleImpression event received with data: {data}");
}
```
## Testing adaptive inline banner integration {#test}
{% list tabs %}
- Android
### Using demo ad units for ad testing {#demo-blocks}
We recommend using test ads to test your adaptive inline banner integration and your app itself.
To make sure that test ads are returned for each ad request, we created a special demo ad placement ID designed to help you test your ad integration.
Demo adUnitId: `demo-banner-yandex`.
{% note warning %}
Before publishing your app in the store, make sure to replace the demo placement ID with the real ID you obtained in the interface Boost.
{% endnote %}
For the list of all available demo ad placement IDs, see [Demo ad units for testing](https://boost.yandex.com/doc/en/ad-monetization/dev/android7/demo-blocks.md).
### Testing ad integration {#test-int}
You can test your adaptive inline banner integration using the SDK's built-in analyzer.
This tool checks whether ads are enabled properly and outputs a detailed report to a log.
To view the report, search the keyword “YandexAds” in [Logcat](https://developer.android.com/studio/command-line/logcat), a tool for debugging Android apps.
```bash
adb logcat -v brief '*:S YandexAds'
```
If the integration is successful, the following message is returned:
```bash
adb logcat -v brief '*:S YandexAds'
mobileads$ adb logcat -v brief '*:S YandexAds'
I/YandexAds(13719): [Integration] Ad type banner was integrated successfully
```
If you're having problems integrating banner ads, you'll get a detailed report on the issues and recommendations for how to fix them.
- iOS
### Using demo ad units for ad testing
We recommend using test ads to test your ad integration and your app itself.
To make sure that test ads are returned for each ad request, we created a special demo ad placement ID designed to help you test your ad integration.
Demo adUnitId: `demo-banner-yandex`.
{% note warning %}
Before publishing your app in the store, make sure to replace the demo placement ID with the real ID you obtained in the interface Boost.
{% endnote %}
For the list of all available demo ad placement IDs, see [Demo ad units for testing](https://boost.yandex.com/doc/en/ad-monetization/dev/ios7/demo-blocks.md).
### Testing ad integration
You can test your ad integration using the native Console tool.
To view detailed logs, call the `MobileAds` class's `enableLogging` method.
```swift
MobileAds.enableLogging()
```
To view SDK logs, go to the Console tool and set `Subsystem = com.mobile.ads.ads.sdk`. You can also filter logs by category and error level.
If you're having problems integrating ads, you'll get a detailed report on the issues and recommendations for how to fix them.
 {% endlist %}
## Tips
### Ad preloading
Loading an ad may take several seconds, depending on the number of ad networks connected in Mobile Mediation and the user's internet speed. We recommend preloading ads before displaying them.
You can load an ad at app startup or just before it's shown. Make sure to preserve the object between scenes using the `DontDestroyOnLoad(gameObject)` call. That ensures the ad that's loaded is not deleted with the `gameObject` on scene change.
When you then need to render the banner, call `banner.Show()`.
If you cache ads on too many screens that are unlikely to be shown, your ad effectiveness could drop. For example, if users complete 2-3 game levels per session, you shouldn't cache ads for 6-7 screens. Your ad viewability could decrease otherwise, and the advertising system might deprioritize your app.
To ensure caching benefits your app, monitor the “Show rate” or “View rate” metrics in the Boost interface. If it's under 20%, you should probably revise your caching algorithm. The higher the percentage of impressions, the better.
### Clearing unused memory
We recommend calling `banner?.Destroy()` and re-creating the `Banner` object before each ad request. That ensures that all memory that was utilized is cleared, and the app can request and show ads many times without overwhelming the device. That can also prevent code errors related to repeated ad loading and lifecycle disruptions.
## Additional resources {#resources}
*
Link to [GitHub](https://github.com/yandexmobile/yandex-ads-unity-plugin).
{% endlist %}
## Tips
### Ad preloading
Loading an ad may take several seconds, depending on the number of ad networks connected in Mobile Mediation and the user's internet speed. We recommend preloading ads before displaying them.
You can load an ad at app startup or just before it's shown. Make sure to preserve the object between scenes using the `DontDestroyOnLoad(gameObject)` call. That ensures the ad that's loaded is not deleted with the `gameObject` on scene change.
When you then need to render the banner, call `banner.Show()`.
If you cache ads on too many screens that are unlikely to be shown, your ad effectiveness could drop. For example, if users complete 2-3 game levels per session, you shouldn't cache ads for 6-7 screens. Your ad viewability could decrease otherwise, and the advertising system might deprioritize your app.
To ensure caching benefits your app, monitor the “Show rate” or “View rate” metrics in the Boost interface. If it's under 20%, you should probably revise your caching algorithm. The higher the percentage of impressions, the better.
### Clearing unused memory
We recommend calling `banner?.Destroy()` and re-creating the `Banner` object before each ad request. That ensures that all memory that was utilized is cleared, and the app can request and show ads many times without overwhelming the device. That can also prevent code errors related to repeated ad loading and lifecycle disruptions.
## Additional resources {#resources}
*
Link to [GitHub](https://github.com/yandexmobile/yandex-ads-unity-plugin).